Stonemountain Spotlight: Button-Up Shirts

About the Stonemountain Spotlight
For each Spotlight we choose a specific pattern, fabric, or sewing technique, and invite the Stonemountain & Daughter staff to each make their own version. We love seeing how everyone interprets the project, adding their own unique style, and we love sharing what everyone has made. This month we decided to focus on a wardrobe classic, the button-up shirt! We invited our participants to select one of our button-up shirt patterns and fabric and buttons from the shop to sew a garment of their choice. We were absolutely blown away by the staff’s creativity, and we’re so excited to share our projects with you!
The Button-Up Shirt
A popular garment for generations, the button-up shirt remains a staple of our contemporary wardrobe. This garment is worn all over the world, by people of different genders, cultures, and socioeconomic backgrounds. It’s an enduring style that can be made in a sturdy cotton twill for workwear uniforms, or in fine fabrics like silk for special occasions. It’s all about the details with a button-up shirt! The double-layer yoke and flat-felled seams evoke the hardwearing past of the American West, while the collar and chest pocket represent classic menswear. We thought it would be fun to start with an iconic garment design and invite our staff to interpret it in their own way.
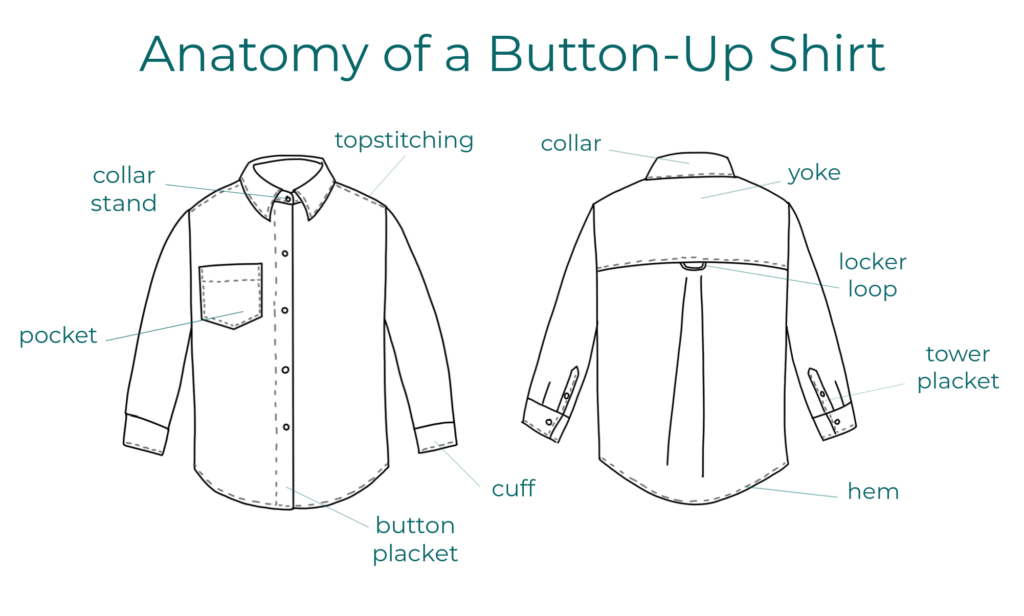
Our Selected Patterns
At current count we carry over a dozen different button-up shirt patterns in the shop! For this Spotlight, we selected a handful of patterns that include the hallmarks of a button-up shirt, and gave our staff the opportunity to select one and make it truly their own. Our selected patterns include the Friday Pattern Company Butano Button Up, Merchant & Mills The Arbor, the Closet Core Jenna Shirt & Dress, The Assembly Line Front Pleat Shirt, and The Assembly Line Oversized Shirt—while our staff sewists started their projects with these patterns, we gave them free reign to modify them as little or as much as they wanted to.

Friday Pattern Company Butano Button Up

Rebecca’s shirt features Kitchen Window Wovens – Yarn Dyed Cotton – Small Gingham – Dragon Fruit with neon pink heart buttons by Tabitha Sewer and Whisper Weft interfacing.
“Friday Pattern Company designs are some of my favorites. I’ve been meaning to make the Butano since its release and I’m glad I finally got the opportunity to make it. This garment is right up my alley and I think the fabric is my style. I’ll likely add it to my work wear rotation. I love the color combo. It’s about as heavy as a quilting cotton which I think will make for a sturdy, long-lasting shirt.
The Butano has a few curves on the bottom edge and I had a really hard time turning up the hem. I tried a few methods to assist in making this part of my project easier, but no luck! I tried sewing a ¼ inch edge stitch, clipping/notching the curves, and using a basting stitch to pull the fabric into the shape I wanted. I ended up with a wonky hem and I’m okay with that! I used Whisper Weft interfacing, recommended by Craig. I’d never used it before and I really liked the outcome. I always had a hard time using woven interfacing, as it would bubble up on me after washing. My new go-to is Whisper Weft!”

Marissa’s shirt features Designer Deadstock – Printed Linen – Mocha Flower with Wide Rim Plastic Buttons and Whisper Weft interfacing.
“I love the floral print—it’s new fabric but looks like it’s vintage. I like that this linen has a nice weight to it, but it’s still quite cool—it will be perfect to wear in summertime. The fabric seemed too heavy for a narrow, rolled hem, so I drafted a hem facing. I sewed the facing out of a cotton lawn for a lightweight, clean finish. I shortened the shirt length by about 1.5 inches, and it’s the perfect length!
As a person with a large bust, I have a hard time buying button-up shirts that fit correctly and wasn’t sure if this pattern would require adjustment. I selected the size that seemed like it would fit my full bust measurement best and it worked out! The darts are in the right place and I wanted a fairly boxy fit, so happily I didn’t need to do a FBA. I was really careful to place my first button even with my full bust point and space the others based on that one—no gapping!
I love that the Butano Button-Up pattern includes a matching tie, because, for me, that elevates the look to a modern take on Joan from Mad Men (especially with my hair up and carefully-selected accessories like my vintage Heinz pickle tie tack). This shirt is definitely my style, and I’m extremely proud of how well it came out. You’ll probably see me wearing it out and about this spring and summer!”

Franny’s shirt features Black Silk Organza with Vintage Glass Buttons – Black Faceted Oval. She also used black silk organza for interfacing.
“I was inspired by Craig’s shirt idea and after a rewatch of The Philadelphia Story, some of Katharine Hepburn’s costumes.
The silk organza was very structured but not thick, which meant it was easy to handle. I was able to get the small finished seams that I wanted. I took away the pocket and neck tie. I wanted to let the fabric shine and, since organza is sheer, I didn’t want to have too many areas of the shirt that were suddenly opaque from many layers. I also added more buttons along the cuff because I loved the little glass ones that were too small for the front placket.
I didn’t encounter any particular challenges, but I was very conscious the whole time that everything I did would be visible on the finished garment. I made sure to take my time and be diligent with pressing and basting to get a good result.
It’s not quite my usual style—this is my first structured button-up!—but it’s what I want my style to be. I’m going to wear it buttoned with skirts and trousers, or unbuttoned over cute tops. I can also imagine pairing it with my black underbust corset and high button boots!”
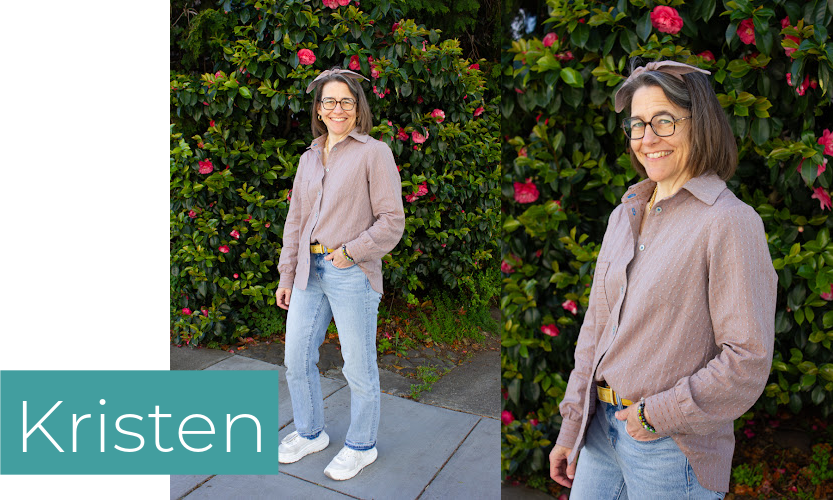
Kristen’s shirt features Queen of Hearts – Yarn Dyed Cotton – Dobby Hearts – Riviera with Genuine Pearl Buttons – Blue Smoke. She used very lightweight natural muslin as interfacing.
“I constructed the shirt with modifications for a petite frame. I took 2 inches from the length of the bodice and about half an inch off the sleeve. The fabric was soft, easy to work with, and would press crisply, which is a great asset when building a button-front shirt! This fabric has an interesting pattern on the “wrong” side so I decided to feature it by cutting & constructing the cuffs, pocket, and collar stand with the reverse side showing.
My bust came in at size S and my hips came in at size M. I wanted the shirt to lean toward fitted so opted for a straight size S. There was enough ease built into the pattern for it to fit just how I wanted.
This was my first try at using a sew-in interfacing. The feel of the final garment is more soft and lush than the result I’ve gotten in the past with fusibles—plus no worry about those pesky bubbles that can show up sometimes. I also used my favorite topstitching thread, Gutermann Mara 70—it is thin enough that I can use it in my bobbin and my machine doesn’t fuss. I LOVE how it turned out and even added some extra topstitching in a couple of places.
I found the bottom hem of this particular shirt to be the most difficult part of the whole thing! It’s got an upside down U-shape and was really tricky. The corners of the U and bottommost curve of the U ended up being slightly narrower than the suggested seam allowance. I also stretched the fabric a bit to get around the curves and put lots of heat and steam at the end to mash it down and flatten it out like a boss!
This garment fits my style nicely, I hope to layer t-shirts under it for our Bay Area weather. I also adore the little tie that comes with it—I’d like to use the tie as a headband to be matchy-matchy with my shirt!”
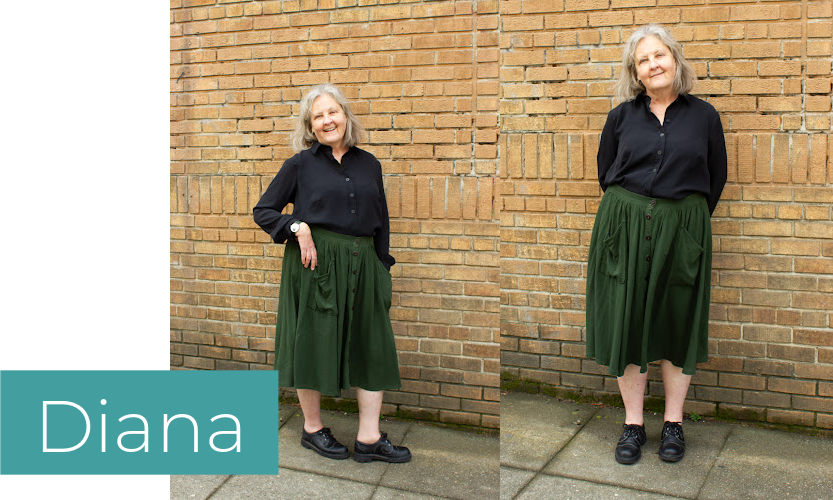
Diana’s shirt features Designer Deadstock – Silk Chiffon – Black and Italian Corozo Buttons – 15mm – Black and Shiny 4-Hole Shell Buttons – Black – 12.5mm. She used Black Silk Organza for interfacing.
“I made a wearable muslin out of a Japanese lawn I’ve had in my stash for about a year, and I’ve been wearing it a lot, so as drafted the pattern is a good fit for me after my customary 2 inch FBA and ½ inch shoulder adjustment. I wanted this shirt to be a bit roomier and the collar, as drafted, was a little deeper than my dream silk blouse. I added two inches to the yoke, 1 inch at the center of both sides to keep the neck opening and sleeve heads unchanged, and had to add the same amount to the fronts and backs. I reduced the collar points by about an inch, and didn’t make the neckerchief.
The silk chiffon takes a press better than I expected and drapes beautifully. I flat-lined the fronts because the fabric is a little sheer and I had enough extra fabric to do that. I also interfaced with sewn-in black silk organza—I didn’t want any stiffness from the interfacing to interfere with the drape and I’ve been interested in trying some couture techniques, so this was a great opportunity.
I love a clean finish, so I added 1/4” to the side and underarm seam allowances and made French seams. I decided to bias-bind the sleeve seam, so I added that before proceeding to the side seams. I made a rolled hem by stitching ¼ inch around the button as a fold line/stabilizer, folded over another ¼ inch, and stitched along the edge. I am generally a shirt tucker-inner, so I’m not very perfectionist about shirt hems.
When I made my first pass at topstitching the button facing the fabric shifted a good inch or more, despite using a thousand pins, so I broke out my walking foot and never looked back, or took it off, except when doing the button holes. For shifty fabric it is worth its weight in gold. I also used my straight stitch foot plate, standard procedure for me with very lightweight fabrics.
I hand basted, a lot, to stabilize tricky seams and where there were multiple layers of fabric. It probably added 15 minutes to the overall process. As always, I just need to take a breath and use the more time-consuming prep steps, because it saves time in the long run. I used extra fine silk pins and an 80/12 Microtex needle throughout, and shudder to imagine what might have happened if I hadn’t.
I cut the fronts by pinning in a single layer and cutting with my trusty shears, but had an uneasy feeling about the silk shifting, so I sandwiched the rest of the pieces between two layers of tissue paper and that was the skeleton key to stable(-ish) cutting using my rotary cutter. Sometimes what seems like an extra step is really saving time and frustration over the whole process.
A drapey black button-up had been on my ‘I really need one of these’ list for a while, so when this Spotlight was announced I made a beeline for the black silks. Since I wear a lot of black and separates (and don’t mind handwashing), this shirt will slot into my wardrobe like a missing piece. I travel as much as I’m able, and have two well-worn ready-to-wear basic button ups (one grey silk, one navy rayon) that are absolutely essential because they wash up in a sink, dry overnight, and don’t hold wrinkles. I plan to take this new, versatile, highly breathable shirt on many adventures.”
Merchant & Mills Arbor
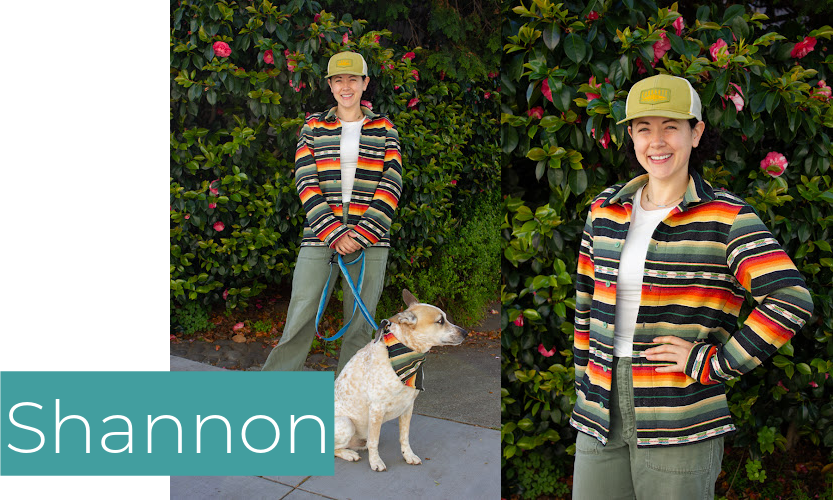
Shannon’s shirt features Heavyweight Yarn Dyed Cotton Stripe – Black/Orange with Recycled Cotton Buttons in Leaf. She used Pellon Shape-Flex 101 interfacing.
“I sewed this garment for my husband, he picked out the material and the buttons. He really loves Southwestern patterns and was very excited at the thought of having a button-up shirt with this material.
This project was good practice on how to line up patterns on fabric. I usually cut into things willy-nilly, so it was good practice to be mindful about placement. The horizontal lines help keep everything straight. The fabric that I used is heavier-weight, so some parts that were folded were very hard to get through my sewing machine.”

Sicilia’s shirt features Black Silk Organza with Shiny 4-Hole Shell Buttons in black. They used silk organza for interfacing as well.
“Wearing this fabric, I love the way it floats around me, structured enough to really showcase the architecture of the garment while still having a nice drape. If my body is a temple this organza is a beautiful stained glass window, filtering the light in a seductively gothic manner. I knew I wanted to make the Arbor after trying on a sample at Studio Sessions and realizing that it fit me near perfectly! However, to fit the vision of this specific project I switched from the drafted long sleeve to a short sleeve and significantly cropped the overall length (by almost 7 inches!)
I’m a quick and dirty sewist—I’m not super precise, and I’ll never brag about the “guts” of my garment, but as long as no one can see it it’s none of my business! Given that, I might have been a bit delusional to make a sheer garment where everyone can see EVERYTHING!! Keeping the hems and seams of this shirt even and neat was a challenge for me, as was the amount that the organza frayed. I frankly DID NOT enjoy swapping out my serger for French seams! This was a lesson in patience and slowness that I don’t want to repeat anytime soon, but I am impressed by and proud of the finished result.
This feels like an elevated version of my usual style. I’m in boxy menswear all the time, but it’s usually not sheer! I’m excited to have formal menswear that doesn’t feel boring or business-y, and I’m planning on wearing this to a friend’s wedding.”
Assembly Line Front Pleat Shirt
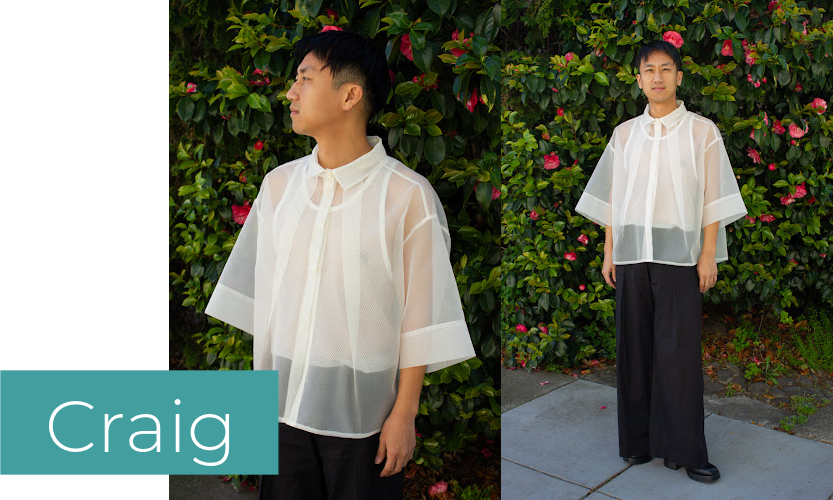
Craig’s shirt features Silk Organza with Shiny 4-Hole Shell Buttons. He did not use interfacing.
“My inspiration stems from the barong, a traditional Filipino formal shirt and the national dress of the Philippines. Growing up, I always loved seeing my friends don the barong for special events like prom or family weddings, so from a young age I’ve always appreciated the beauty, work, and significance these shirts had.
Silk organza isn’t the softest fabric, so keep that in mind when using it. Ironing the hem of my shirt was tedious and required lots of pinning. I used French seams where it was appropriate. Silk organza also makes a great interfacing and pressing cloth.
I made two modifications to the pattern. First, I used the front hidden placket pattern piece for both sides of the front of the shirt. I wanted to add more stiffness and increase the opacity in the placket so using the hidden placket pattern piece on both sides meet both of these needs. Second, I sewed down the front pleats about 2/3rds of the way down and subtly adjusted its placement to create a cleaner and crisper feel. I made a size XL, but due to the modifications I made, I had to size up my collar band to a 3XL.
I love layering, especially sheer pieces. I’d most likely wear this to go out to a nice dinner, a special event, or casually to go shopping.”
Assembly Line Oversized Shirt

Caspian’s shirt features Sprout Wovens – Textured Yarn Dyed Cotton – Obsidian with Lady McElroy – Berwick Cotton Lawn – Tartan Check and Merchant & Mills – Cotton Button – Bright Blue. They used Suitmaker 601 – Fusible Weft Viscose/Polyester Interfacing.
“I love the soft drape on this fabric, which gives this shirt a more casual feel. The fabric feels amazing, presses great, and is super easy to sew! Plus, the subtle yarn-dyed pattern adds just a bit of interest. I lengthened the sleeves by 2 inches and shortened the body by 3 inches. Instead of using the collar of the Oversized Shirt, I used the neckline, collar stand, and collar from the Cashmerette Vernon Shirt, which fits me much better. At the last minute I decided to add some fun reverse applique inspired by an upcycled shirt by the brand Minski. I drew star shapes on the elbows, side body, and yoke, and used a dense zig-zag stitch to sew the contrasting fabric on the wrong side of the shirt. Then I cut away the main fabric to reveal the applique! I’ve been enjoying a more casual, lived-in, playful style lately, so I tried to add those elements into this shirt. I also like styling it to contrast with the more “formal” style of loafers and the tie (which I customized!).
I absolutely hate stitching in the ditch, so if you’re like me, I highly recommend hand-sewing the interior collar stand, cuffs, and yoke. This way, I never have to stress about catching those tricky sections with my machine and I can be so much more precise!”

Noelle’s shirt features Atelier Brunette – Rayon/Cotton Sateen Stripes – Night and deadstock glass buttons from our ½ off button wall. They used Black Silk Organza for interfacing.
“I like that this fabric has the drapey properties of rayon, but the ease of sewing up like cotton. I added 15cm to the length to be worn as a shirtdress, shortened the sleeves for fit, made the collar slightly larger and pointier for the drama, added swing tack belt loops and a self-fabric belt. I sized up one size for even more of an oversized fit.
I overlocked all the seams for a fray-proof finish. I tacked a piece of heavy thread into the corner of the collar point while sewing upper and under collar pieces together to allow for easy and sharper turning of the point. I also made the buttonholes ⅛ inch larger than the width of the button to accommodate the oval shape of the button. The shaped, rolled hem was tricky in some places with this fabric because of the drapey nature of the rayon, especially on the parts where it is on the bias. I used a hot ruler to press really well to make sure my hem allowance was even, and then stay-stitched before rolling the hem.
This garment definitely fits my usual spooky aesthetic, and I love wearing it both as a shirtdress with the belt, and unbuttoned as a duster. I’ll definitely be wearing this one plenty at work!”

Ruby’s shirt features Swedish Holiday – Yarn Dyed Cotton – Astrid Weave – Cobalt with white shell buttons. She used Whisper Weft interfacing.
“I’ve made this shirt pattern a number of times before in various fabrics. This is one of my sewing projects that I’m the most proud of, specifically for my feat of pattern matching so precisely. I love the *slightly* crepey texture of the fabric after I washed it, and the double weave coverlet-esque pattern (obviously).
I made a number of mods to the pattern:
• I cut a size medium for the body and sleeves, but a size small for the yoke/collar stand/collar. I added front pleats and expanded the back side pleats to make up for the sizing discrepancy. I wanted the shirt to fit very oversized in the body, but somewhat more “fitted” in the shoulders and with less of a drop shoulder than the medium would have given me.
• I added a covered/concealed button placket so that the pattern of the fabric could continue in its extended glory uninterrupted.
• I cropped the length and changed the hemline to more of a deep cut petal shape rather than the normal softly undulating shirt hem shape. This made it feel much less like a dowdy and conservative smock coverup and more of a chic overshirt with a peekaboo side seam. I cut it to my high hip so I can still see my hips from the side.
• I hemmed the sleeves to be a simple straight hem rather than a shirt cuff with a placket. I just wanted it to be simpler and I know I’ll always roll them up, so this hem is easy and unfussy. Everyone, remember—you don’t have to add any design element that you don’t personally care to include in your garments! If you don’t like button up cuffs, don’t add them! I’ve done this on other button-up shirts and I’m always glad I did.
• I freestyled the concealed button placket and I’m really pleased with the result.
I used a walking foot for almost the entire project. It was my lifeline and the only way I managed to have all the lines of the woven pattern match up so perfectly. I also flat felled the seams and bias-tape bound the armhole seams to make the entire garment sleek and extremely easy to wear. Those finishes make a big difference in feel and it seems imperceptible, but it elevates the drape and overall flow of the garment.
This overshirt is perfect for my style and my habits of daily dressing. I’ve worn it countless times since I made it and it always looks fabulous. It elevates an outfit otherwise comprised of basic items. It’s super comfortable and can even go over another button-up and look great. I would be wearing it right now if it weren’t on display in the store.”

Nola’s shirt features New York Designer Deadstock – Wool Novelty Twill – Tan/Olive and Heavy Duty Snaps. She used Suitmaker 601 – Fusible Weft Viscose/Polyester Interfacing.
“I loved that this fabric had a heavier weight and deep twill weave, while still having a lovely drape and even a bit of a sheen. Because of the heavy weight of my fabric, I had to take some extra steps to make sure everything was cleanly finished—like using a facing at the sleeve slits instead of the folding technique used in the pattern, and doing a lot of basting where I usually might have just pressed, like at the hem and collar.
I added at least 4 inches to the sleeves, and I hemmed the shirt (in size S) to the XS length. I used our snap setter tool to *set my snaps* which ended up being super easy but did require some hammering work, which was best done outside (sorry to my downstairs neighbors!). In my first go I transferred my pattern markings incorrectly and ended up cutting my cuff slits in the wrong place! Luckily I had extra fabric and was able to recut the sleeve block.
I think this shirt fits very well into my wardrobe and I’ve been wearing it all the time. I made it in homage to my favorite vintage corduroy overshirt—this shirt feels like an elevated, more unique version of something I already love! I’ve been able to dress it up with cropped jeans and a heel or wear it as a light jacket with hiking boots—I’ve even worn it as a shirt dress with tights and tall boots. It’s super versatile and I love that it’s wool so it keeps me warm!”
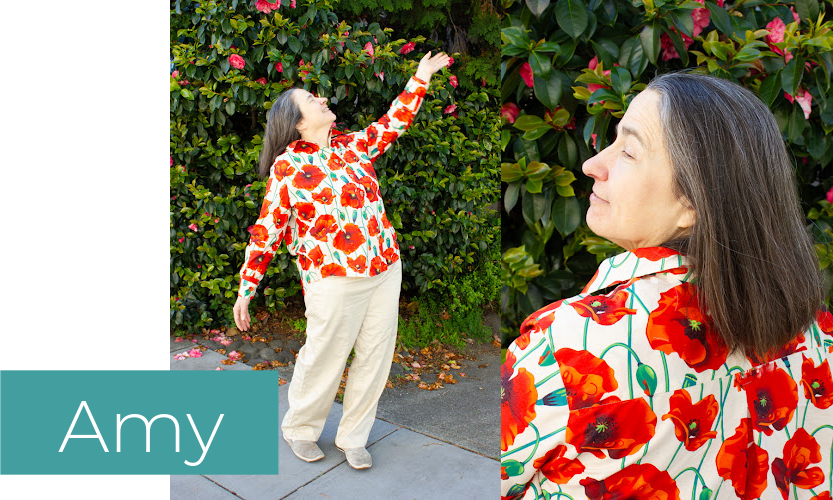
Amy’s shirt features Lady McElroy – Cotton Poplin – Poppy Fields – Cream with Atelier Brunette Joy Enamel Buttons in Cactus. She used Silk Organza as interfacing.
“The Lady McElroy Poppy Fields cotton poplin has been looking at me since we first got it in the store, and this was the right project for it. The poplin is light and smooth—this will be comfortable worn with slacks or jeans on hot summer days in the store.
I shortened the pattern by 6 inches, and could have shortened the arms a bit as well—even though I went down a size for a slightly more tailored fit. I think I’m a convert to using silk organza for interfacing—it certainly works well with a lightweight cotton woven.”
Closet Core Jenna Shirt & Dress

Anna’s shirt features Washed Cotton Poplin – Emerald and Washed Cotton Poplin – Sapphire with Half Ball Cover Buttons 7/16“. She used Silk Organza as interfacing.
“I love combining different colors together and I’ve been ogling the washed poplin in these two colors for a while. Blue and green together, couldn’t be better! I love taking something classic and adding a twist by color blocking. I loved how little the washed poplin frayed! It washes up beautifully and has a crisp-yet-laundered look that I love. I didn’t have time to make up a muslin, so I cut and sewed as instructed to see how it would turn out!
There were two elements of the sewing instructions that I don’t feel worked for me. I used their method of sewing the collar and collar stand, and I found it more finicky than the normal way I attach collars/stands. I also felt confused about the gusset application. I ended up removing it and just using a bar tack because I couldn’t figure it out. I think a video tutorial would be helpful for this step!
I used my vintage 1960’s Singer buttonhole maker. It was my first time ever using a buttonhole attachment! Once I got the hang of it, it was so fun to use. I also used silk organza as interfacing for the first time. I was struggling with keeping everything on grain, but then I remembered to pull out a single thread to maintain grain and it was much easier. I did have to switch thread/bobbin colors a lot since I wanted the thread to match everywhere!
This garment is very me, the colorblocking and colors are exactly my style. I’ve purchased many vintage men’s button-ups in the past, but this is the first time I’ve successfully made one for myself!”

Ashlee’s shirt features Giza Sateen – Egyptian Cotton – Black with Atelier Brunette – Gem Button – Amarante. She used Suitmaker 601 Fusible Weft Interfacing.
“This shirt is definitely my style, black with a slight historic nod. The Giza sateen is so luxurious! It is so soft, with a nice drape and a great sheen.
I’m between sizes, and without thinking cut the smaller size. This would have resulted in the shirt being more fitted, when it’s supposed to be oversized. I caught my mistake before I got too far in construction, and ended up adding side panels to the shirt. I think I may have gone too far in the other direction though and made the shirt too big. I might go back later to shrink the panels.
I added pin tucks to the front as well as the cuffs. This wasn’t done in time for the photos, but I cropped the shirt and gathered it into a waistband. For the first half of the pintucks I used a special vintage pintucking foot, but stopped using it because I ended up having better luck manually marking the pin tucks.”
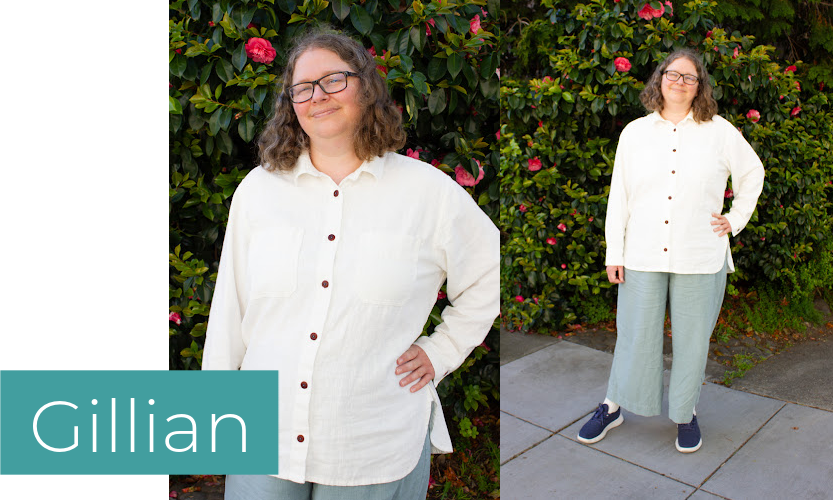
Gillian’s shirt features Stonewashed Ramie in Ivory with Ornate Corozo Buttons in Mahogany. She used Pellon Fusible Lightweight Shape-Flex interfacing.
“Stonewashed Ramie is one of my favorite fabrics that we carry at Stonemountain! It has a beautiful, nubby texture and it gets even softer after washing. It’s also a perfect heavier medium-weight that works for most garments. It’s truly an elevated basic that could form the backbone of a trans-seasonal wardrobe!
Some parts of the construction were a little tricky with a thicker fabric, the collar especially. Using a lighter interfacing really helped, and I also made sure to take my time and grade seams where needed! I hadn’t used Lightweight Shape-Flex before, and it worked perfectly to stabilize the collar of the shirt without making it too stiff.
I haven’t worn button-up shirts much in the last few years, but recently it occurred to me that a button-down in a slightly heavier linen or ramie would be the perfect transitional garment. Ramie is breathable but also insulating, so it’s the perfect fabric for Bay Area days with chilly mornings and warm afternoons! This shirt is a classic slightly-off-white that looks good with almost anything. I like wearing it with wide-leg linen pants, but I can also see it with shorts in the summer or even as a light cover-up over a sundress!”

Kim’s shirt features European Designer Deadstock – Cotton Sheeting – Mod Floral and Square Corozo Buttons – 25mm – Teal. She used Pellon Shir-Tailor Fusible Interfacing.
“I don’t usually wear oversized shirts, but I really love the look of the Jenna Shirt. I used the Grainline Lark pattern to make a matching knit t-shirt to wear underneath. I altered the Jenna pattern by making the cuff half the width of the original. The fabric was very easy to sew and I love how soft it is.”
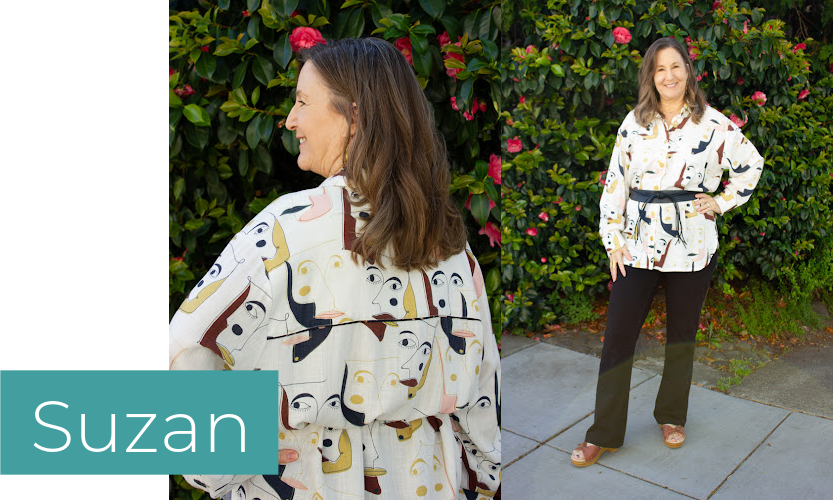
Suzan’s shirt features Lady McElroy – Trudi Linen/Viscose – Picasso Theatre and Atelier Brunette – Joy Enamel Button in Mustard.
“I absolutely love a linen/viscose blend—it’s the best of both worlds! The linen gives it a beautiful, earthy texture and weight, while the viscose adds a softness and fluid drape that feels amazing on the body. This Lady McElroy print is just stunning, too—artful, bold, and totally wearable. It makes the shirt feel special without being too loud.
“For this project, I asked Kim Heggins—an amazing sewist and part of our team here at Stonemountain—to make this beautiful button-up for me. She added a clever little touch: we used natural muslin for the back yoke lining, so the bold print wouldn’t show through. It keeps things looking clean and polished from the outside while still letting that incredible Lady McElroy fabric shine. Kim’s attention to detail always makes the difference! We also added a fun little detail with bias binding from Atelier Brunette—we used it on the inside back yoke and along the edge of the pocket. It’s subtle but gives the shirt a beautifully-finished look and a little extra polish. Those tiny touches make it feel extra special and so rewarding to wear.
Topstitching this linen blend was a bit tricky in places, so we skipped some of it where it didn’t want to behave. Honestly, the fabric has such a lovely finish that it still looks clean and intentional. The hem especially turned out great thanks to the linen’s structure! We also had to shorten the sleeves by a few inches—they were super long on me. Once we adjusted the fit, it all came together beautifully. Just one of those reminders that even little tweaks can make a big difference in how a piece feels on your body.
It’s a little longer and flowier than what I usually wear, but I love that—it gives it a relaxed, effortless vibe. I can wear it loose over jeans or leggings, or belt it for a more structured look. It’s super cozy, but still feels put-together. I’d definitely wear it out with friends or to a fabric show—this print really makes a statement! It’s bold, artistic, and totally feels like something a fabric lover would appreciate. It’s the kind of piece that starts conversations!
This shirt feels like a true wearable piece of art. Between the painterly Lady McElroy print, the glossy enamel buttons, and those little touches like the bias binding—every part of it feels intentional and joyful. I love that it was made by Kim, someone I work with and admire. It’s the kind of garment that reminds me why I love fabric and sewing so much!”

Olivia’s shirt features MeetMILK – Tencel Twill – Two-Tone Stripe – Pecan with Matte Plastic Buttons. She used Silk Organza 42 inch – Cream for interfacing.
“I liked that the fabric was a tonal stripe, that it was drapey (which makes the garment feel elevated & elegant), and the color (it will incorporate into my wardrobe nicely as I have a lot of earth-toned pieces). I have been wearing this style a lot lately! I like to wear it unbuttoned as an overshirt—basically a light layer.
I left off the front pockets and the hang loop on the back yoke. I wanted the shirt to feel really modern and simple! I French seamed everything, and I used silk organza as an interfacing for the first time. The organza really leveled up the garment and resulted in subtle stiffness at the cuffs and collar that is simply divine—I’m obsessed with organza now!
I found the method outlined in the instructions for hemming the shirt a little frustrating. It has you fold the hem ¼ inch and then ⅜ inch, which was tricky—the hem is curved, so you are folding excess fabric into the hem. It took some extra patience to get it to look neat. I think next time I will hem it with either bias tape or a hem facing!”
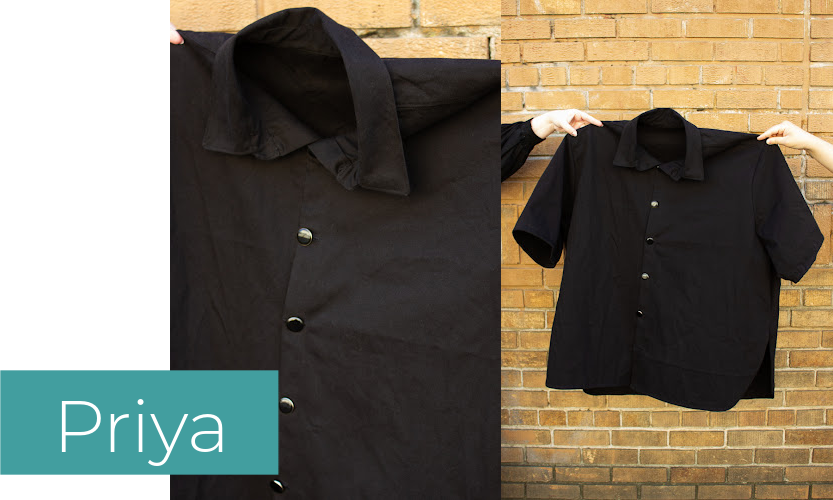
Priya’s shirt features Atelier Brunette – Cotton Gabardine Light – Black and Atelier Brunette – Dotty Enamel Button. They did not use interfacing.
Priya was going for a cowboy-vampire look when they made their short-sleeved Jenna in sleek black cotton gabardine. “I made it to be more formal than the clothes I usually wear, and I actually followed the instructions, for the most part!” They thought the fabric was a nice weight and was easy to work with, although the fabric’s weight made hemming the garment a challenge: “I used bias tape for the hem because getting it folded nicely was not happening.”
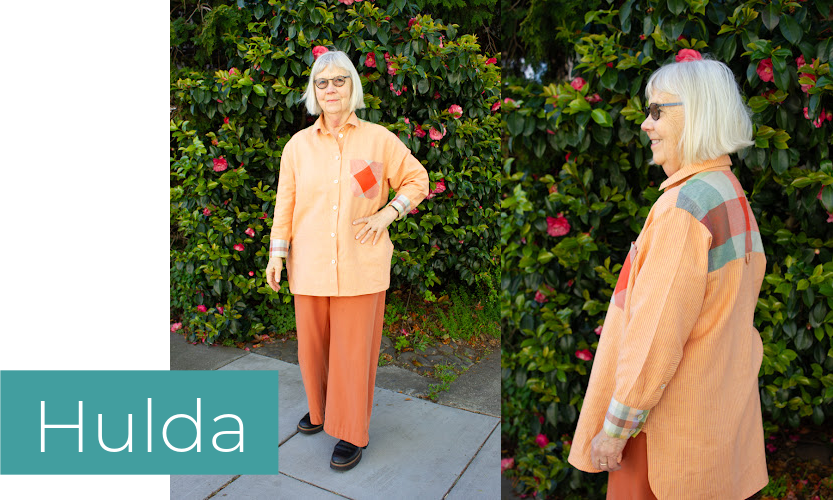
Hulda’s shirt features Utopia Washed Linen/Cotton – Stripe – Apricot with collar, yoke and cuffs in two Merchant & Mills plaid linens from her stash. She used Genuine Pearl Buttons – White in 15mm and 12.5mm and Pellon Shape-Flex 101 interfacing.
“I love the color, the fabric weight, and the way the different fabrics magically work together. In addition to adding contrasting fabric on the collar, yoke, and cuffs, I shortened the sleeve length by almost 3 inches.
I paid for the excellent Closet Core tutorial, and I learned a lot of new tricks of the trade. I also used Fray Check on the buttonholes, and it really helped control the pesky linen. The tutorial recommended sewing the cuffs before attaching them to the shirt. I didn’t follow orders, and the cuffs were a lot trickier to deal with once the sleeves were in place. Lesson learned!
My button-ups may be my favorite garments, and it’s great to have a new one for spring! I’m already fantasizing about my next button-ups using my new skills with cotton lawn, lightweight wool, and more linen.”
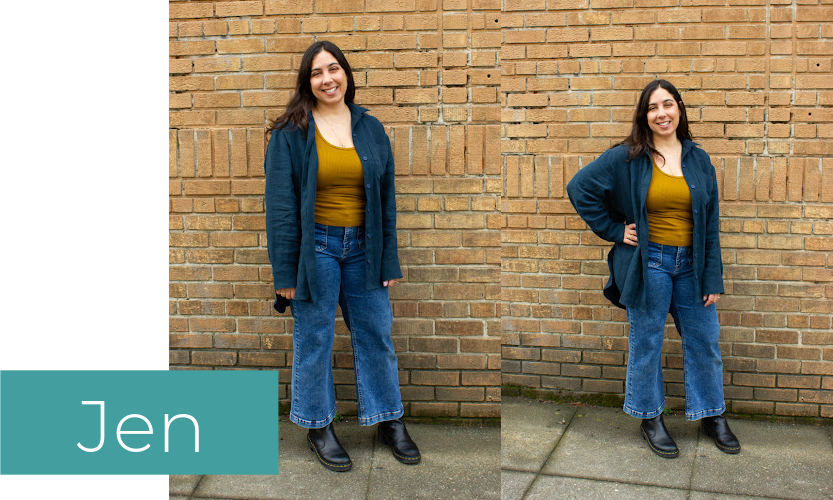
Jen’s shirt features Sandwashed Linen Twill – Jewel with Merchant & Mills – Cotton Button – Mid Teal. She used Sewer’s Dream – Fusible Knit Polyester Interfacing – Black.
“I love this fabric so much! The color, texture, weight, twill weave, and drape are just gorgeous! It’s a midweight linen that feels substantial but has a gorgeous, gentle drape. It was a bit challenging to sew some of the more precise details like the tower placket on the sleeve, but it had enough structure that I was able to make it work.
The only modification I made was grading to a larger size at the hips. Next time I make this pattern I will definitely shorten the sleeves and the body by a couple of inches. Make sure you have a good marking tool and don’t skimp on transferring all of the notches and marks! I used my Chaco marking tool, but I also used the chalk pencils because they are good for marking precise circles. Next time I am going to buy some Chacopy tracing paper to make it easier to transfer all the marks.
This project was a journey for me. I made a muslin and the fit was almost perfect, but I did not attach the sleeve cuffs and didn’t realize how much length they would add to the final garment. I will definitely shorten them next time! I also ended up changing my interfacing—Presto Sheer was too firm for the drape of the linen, so I pulled it off and used the lighter, knit Sewer’s Dream. I also attached both the collar stand and collar backwards. I ended up leaving the collar stand but re-doing the collar since the side I made the top look so pretty and I didn’t want it to be hidden on the underside.
Finally, I’d say the thing that bothers me the most is that when I was attaching the sleeves I couldn’t find all my notches on the sleeve and body, so I did my best to space it out, but one of the sleeves has a bit of fullness happening at the sleeve cap. It almost looks like a puffed sleeve, but the other sleeve came out so well!”
Sew Inspiring
A huge thank you to the Stonemountain & Daughter staff for participating in the Spotlight, sewing some amazing button-up shirts, and sharing their thoughts about their creations! Have you made a button-up shirt you’re especially proud of? We’d love to see it! Email us info@stonemountainfabric.com or tag us #stonemountainfabric on Instagram to share!